Team Management
Contentrain Studio uses a two-tier role system for access control. Workspace roles govern high-level access, while project roles provide fine-grained permissions within individual projects.
Inviting Members
Workspace Invitations
To invite a new member to your workspace:
- Navigate to Workspace Settings > Members
- Click Invite member
- Enter the invitee's email address
- Select a workspace role (Admin or Member)
- Click Send invitation
The invitee receives an email with a link to join your workspace. They can sign in with Google OAuth or a magic link — GitHub OAuth is not required for invited members.
TIP
You can resend an invitation if the original email was missed. Click the resend button next to any pending invitation in the members list.
Invitation States
| State | Description |
|---|---|
| Pending | Invitation sent, not yet accepted (accepted_at is null) |
| Accepted | Member has signed in and joined the workspace |
Workspace Roles
Every workspace member has exactly one workspace role:
| Role | Capabilities |
|---|---|
| Owner | Full control — billing, settings, member management, transfer ownership, delete workspace. Every workspace has exactly one owner. |
| Admin | Manage members, manage settings, access all projects implicitly. Cannot transfer ownership or delete the workspace. |
| Member | Access only explicitly assigned projects. Cannot manage workspace settings or members. |
Implicit Project Access
Workspace Owners and Admins have implicit access to all projects in the workspace. They do not need explicit project member assignments.
Workspace Members must be explicitly assigned to each project they need to access through project-level member management.
Changing Roles
To change a member's workspace role:
- Navigate to Workspace Settings > Members
- Find the member in the list
- Use the role dropdown to change between Admin and Member
WARNING
You cannot change the Owner role through the dropdown. Use the ownership transfer feature instead. You also cannot change your own role.
Removing Members
To remove a member from a workspace:
- Navigate to Workspace Settings > Members
- Click the remove button next to the member
- Confirm the removal
Removing a workspace member also removes their project-level assignments within that workspace.
Project Roles
Project roles control what a member can do within a specific project:
| Role | Content | Models | Branches | AI Chat |
|---|---|---|---|---|
| Editor | Create, edit, delete | View | View, create | Full access |
| Reviewer | View | View | Merge, reject | Full access |
| Viewer | View only | View | View only | Read only |
Reviewer & Viewer require Enterprise Edition
The Reviewer and Viewer roles are available on Starter and above on the managed service, but they are Enterprise Edition capabilities (requires_ee). They only function when the enterprise bridge is present. In a self-hosted Community Edition deployment (no ee/), a member assigned Reviewer or Viewer degrades to Editor — read/write access with no review separation.
Editor
Editors are the primary content creators. They can:
- Create, update, and delete content entries
- Use the AI chat to perform content operations
- Create content branches through edits
- View branches and their diffs
Reviewer
Reviewers focus on quality control. They can:
- View all content (read-only)
- Review branch diffs
- Merge or reject content branches
- Use the AI chat for read operations
TIP
The Reviewer role is ideal for editors-in-chief or content managers who approve content but do not create it directly.
Viewer
Viewers have read-only access. They can:
- Browse content entries
- View model schemas
- View branch diffs
- Use the AI chat for read-only queries
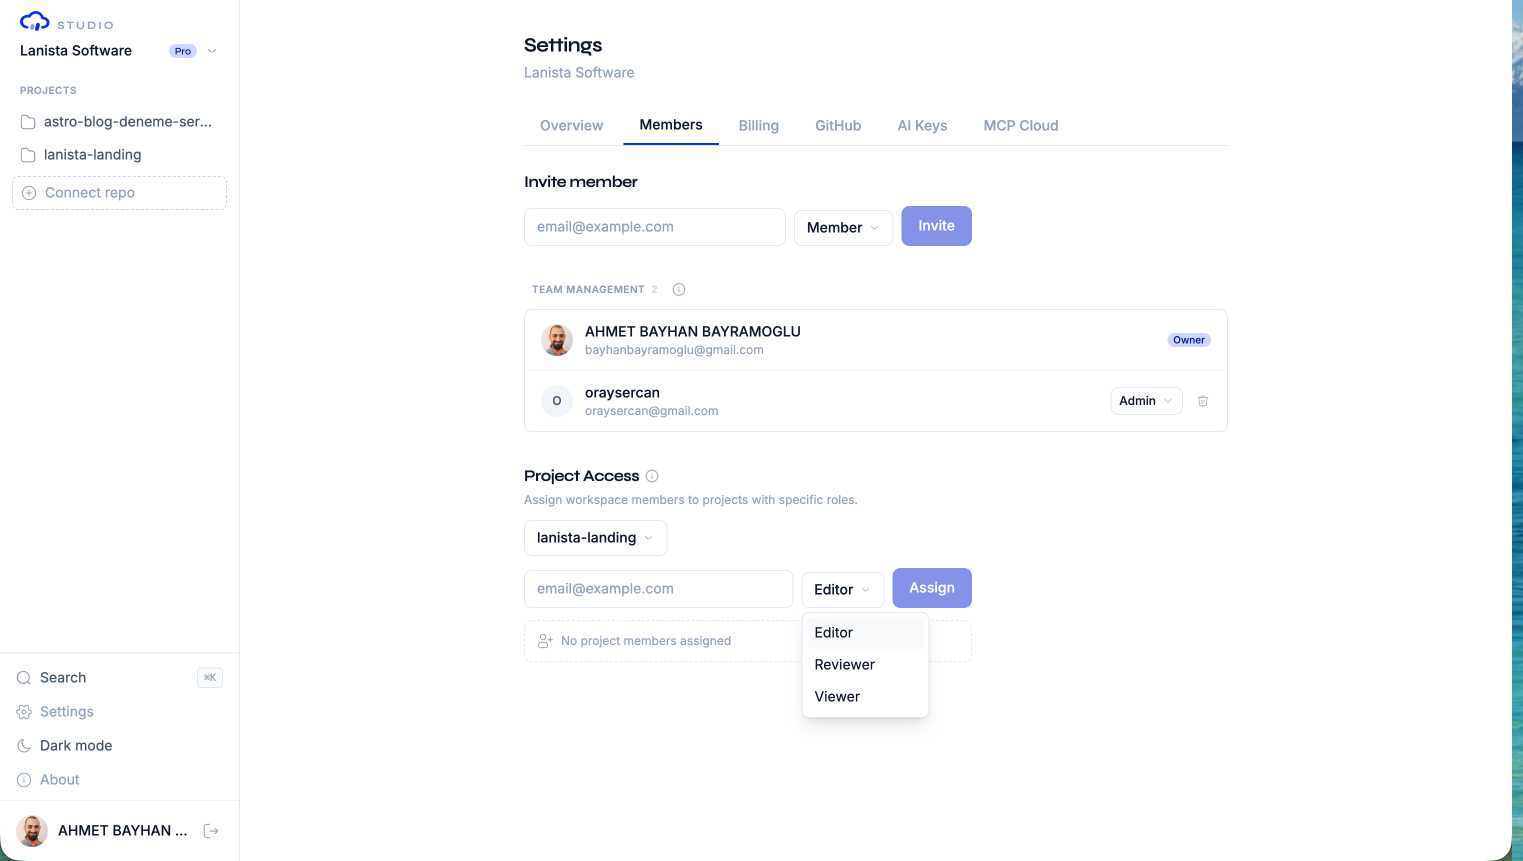
Assigning Project Members
To assign a workspace member to a project:
- Open the project settings
- Navigate to the Members section
- Enter the member's email (must already be a workspace member)
- Select a project role (Editor, Reviewer, or Viewer)
- Click Assign
Model-Specific Access (Pro)
On Pro and Enterprise plans, you can restrict a project member's access to specific models:
- When assigning a project member, enable Specific models
- Select which models the member can access from the Allowed models list
- The member will only see and interact with the selected models
This is useful for large projects where different team members manage different content areas (e.g., marketing team manages marketing models, docs team manages documentation).
Enterprise Edition capability
Model-specific access is gated by the roles.specific_models feature (Pro and above) and also requires the Enterprise Edition bridge (requires_ee). On Free and Starter plans, and in a self-hosted Community Edition deployment, Specific models is always treated as off (full model access).
Permission Matrix
Complete permission breakdown:
| Action | Owner | Admin | Editor | Reviewer | Viewer |
|---|---|---|---|---|---|
| View content | Yes | Yes | Yes | Yes | Yes |
| Create/edit content | Yes | Yes | Yes | No | No |
| Delete content | Yes | Yes | Yes | No | No |
| Merge branches | Yes | Yes | No | Yes | No |
| Reject branches | Yes | Yes | No | Yes | No |
| Use AI chat (write) | Yes | Yes | Yes | No | No |
| Use AI chat (read) | Yes | Yes | Yes | Yes | Yes |
| Manage models | Yes | Yes | No | No | No |
| Manage project settings | Yes | Yes | No | No | No |
| Manage workspace settings | Yes | Yes | No | No | No |
| Manage members | Yes | Yes | No | No | No |
| Manage billing | Yes | No | No | No | No |
| Transfer ownership | Yes | No | No | No | No |
| Delete workspace | Yes | No | No | No | No |
Transferring Ownership
To transfer workspace ownership to another member:
- The target member must have the Admin role
- Navigate to Workspace Settings > Members
- Use the transfer ownership action on the Admin member
- Confirm the transfer
- The previous owner becomes an Admin
WARNING
Ownership transfer is immediate and cannot be undone from the UI. The new owner has full control including billing, member management, and workspace deletion.
Removing Project Members
To remove a member from a project:
- Open the project settings
- Navigate to the Members section
- Click the remove button next to the member
- Confirm the removal
This only removes the project assignment — the member remains in the workspace and can be reassigned to other projects.
Authentication Methods by Role
| Role | GitHub OAuth | Google OAuth | Magic Link |
|---|---|---|---|
| Owner | Required | No | No |
| Admin | Optional | Yes | Yes |
| Member | Optional | Yes | Yes |
Workspace owners must use GitHub OAuth because they need repository access for the GitHub App installation. Invited members (Admins and Members) can use any available method.
Plan Limits
| Feature | Free | Starter | Pro | Enterprise |
|---|---|---|---|---|
| Team members | 1 | 3 | 25 | Unlimited |
| Reviewer role (EE) | No | Yes | Yes | Yes |
| Viewer role (EE) | No | Yes | Yes | Yes |
| Model-specific access (EE) | No | No | Yes | Yes |
| Conversation API keys (EE) | 0 | 0 | 15 | Unlimited |
| API messages/month | 0 | 100 | 3,000 | Unlimited |
| MCP Cloud keys | 0 | 1 | 15 | Unlimited |
| MCP Cloud calls/month | 0 | 5,000 | 150,000 | Unlimited |
| Outbound webhooks (EE) | 0 | 3 | 25 | Unlimited |
Rows marked (EE) are Enterprise Edition capabilities — available on the managed service but hidden in a self-hosted Community Edition deployment. See Billing & Plans for the full feature matrix.
Next Steps
- Workspaces — Manage workspace settings
- Authentication — Understand sign-in methods
- Billing & Plans — Upgrade for more team members